Shields are one of the most important pieces of equipment an ancient warrior could have. In many cases, it is the difference between life and death. Many of the depictions of the ulfheðinn show them with shield and spear. All of these things weighed heavily on me as I considered all the options that lay before me when it came to picking the right shield. Initially, I wanted to go with a fully period shield set-up. This would mean two shields: one for tourneys, and one for melees and war. Both of these would have been rounds, the smaller being 28in and the larger sitting close to the 40in mark. After speaking with more experienced fighters and discussing at length the pros and cons of both, I made the decision that my war shield would be a 2x4 rectangle. The reasons are, as I understand them, that while rounds work well with a dedicated unit all using the same style and trained to fight together, the rectangle works better with mixed shield units. I don't know many people that use round war shields, and I am certainly not training with them, as most of them are too far away. This means it is better for me to use something that will allow me to function within the army at my best. I will still be using a round for my tourney shield, where my choice of shield is more personal.
With the choice finally made, and the necessity of having a shield for war with my round warshield broken, I decided to start work on the rectangle shield. I did some research on what to do and how best to do it. The project was to create a 2x4 curved rectangle shield lined in a fashion that is not obtrusively modern. For the strapping, my goal was to not have a basket and use my gauntlet in the shield. This would let me switch quickly between shield and anything else without sacrificing protection.
 Materials
- 2x4 ½ in Plywood
- Enough leather to edge the shield
- Contact Cement
- Garden Stones
- Weight (I used roof shingles)
- Ratchet Tie Downs
- Artificial Sinew
- Drill
- Belt-grade Leather
- 2x buckles
- Leather Needle
- Masking Tape
- White Spray Paint
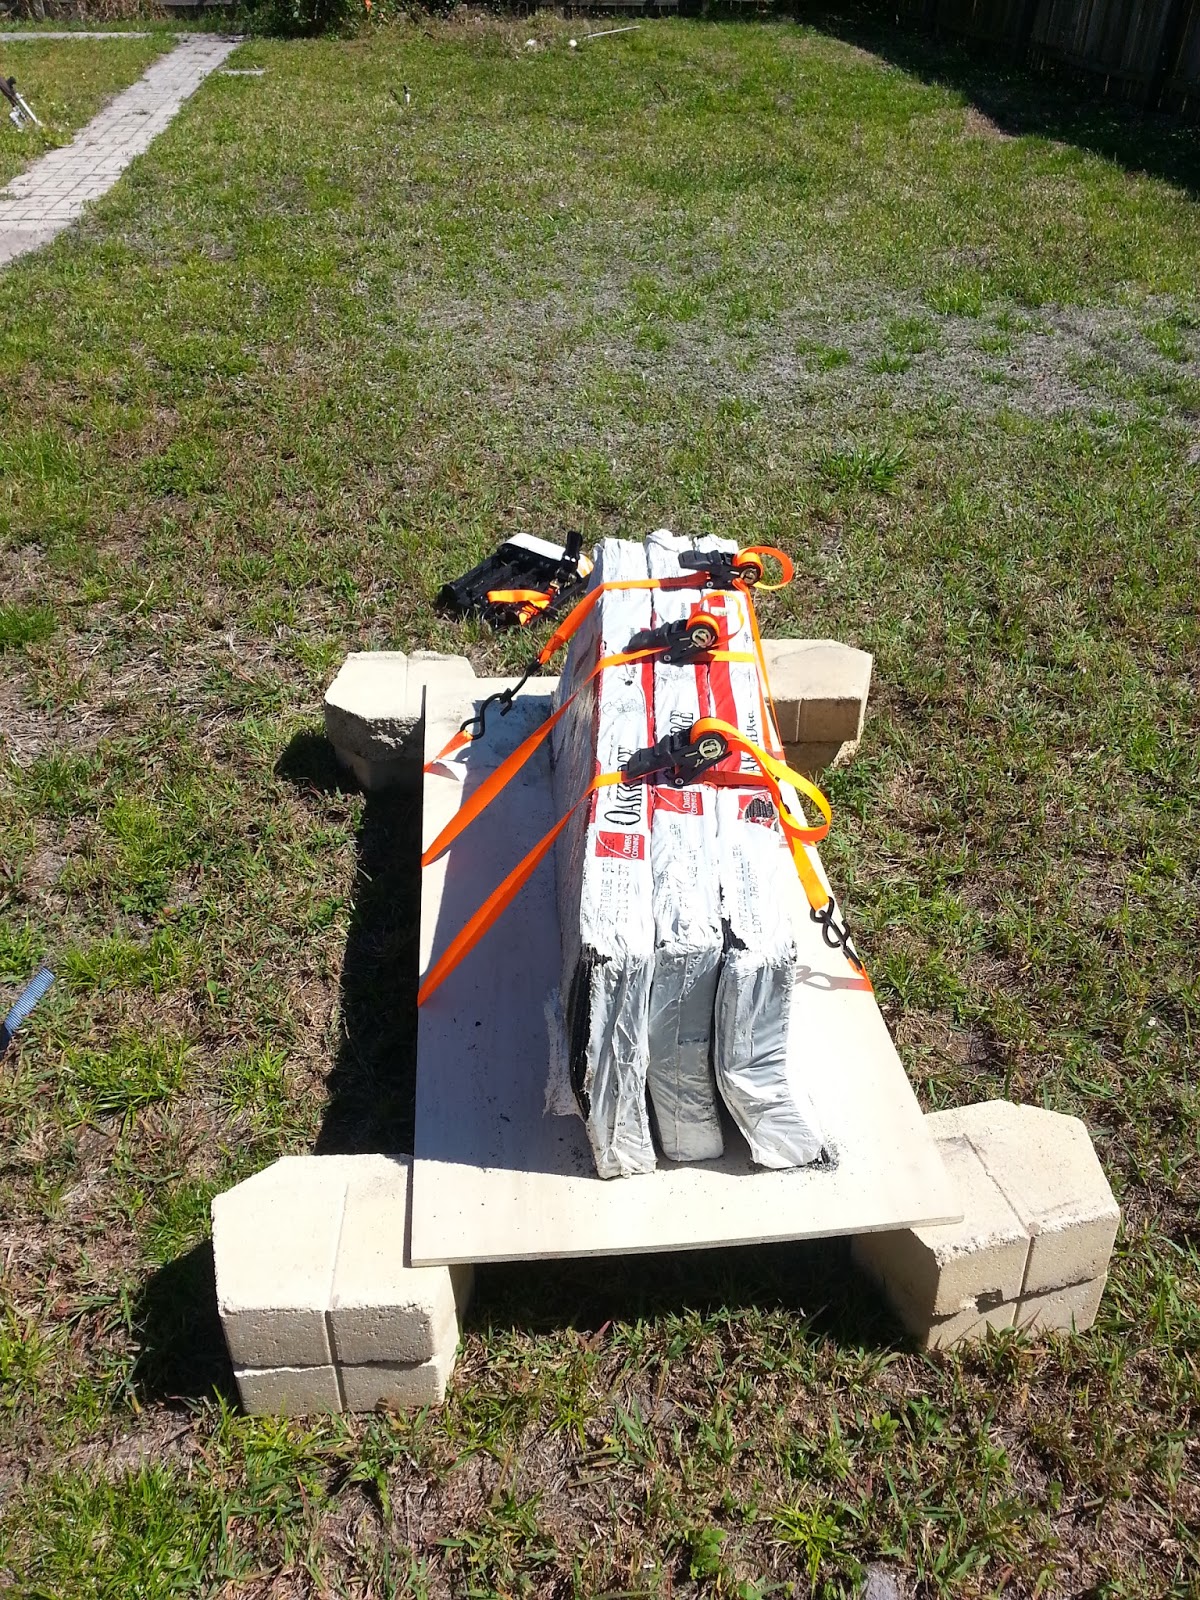
Without time to build a proper shield press before war, and dire lack of thick trees in this area of the world, I made the choice to try and use garden stones and weight and get some curve on, laying the shield blank out between the stacks of garden stones, adding weight onto it, and securing the weight with tie downs. This would have been left overnight to allow the bend to form. Sadly, I had no idea how to use the tie-downs and ended up not being able to secure it properly. This forced me to just lay the weight across the whole thing, instead of centering it, which allowed the weight to be distributed in a fashion that would not make the bend come out. I left the weight on it all night to see what happens. The shield ended with only the slightest hint of a curve. What I now know is that (and this should have been obvious) you need to wet the blank before trying to curve it. Even this option would have been lost to me (since I live in a tiny apartment with no space for anything) if Lord Ardan O Raghailligh hadn’t offered his home and knowledge to cater to my insane needs to try new things two weeks out from war

The next step was painting the blank and attaching the lining. The shield is going to be undecorated for now, so to paint it, I just taped off the edge and sprayed the whole thing white. Taping off the edge was necessary, so that the paint wouldn't interfere with the glue when it came time to attach the edging, which was made out of a very thin leather. The whole process was taught to me by Lord Kjartan Kolgrimsson. He has been really helpful in getting me situated overall since he came to Miami. For the shield edging, he showed me how to cut the strips to twice the width I wanted, then fold them to center: this gave two layers throughout and the clean appearance of a rolled edge. The second step was to mark the center line, and then cover the inside with contact cement. After waiting for the cement to become tacky, we then folded both sides to the middle. This whole process was decently painless, even wit
h my inability to cut a fully straight line! Once all four strips were ready, the shield was again taped off in such a way that glue wouldn’t get on the shield except for where it would be covered with leather. This was done to give it a nice clean appearance, and it worked. The edging, when it was all done, came out really really nice. I can’t wait to ruin it at war!
Lastly, I needed to get all the strapping done for the shield. This was really straight forward: I cut two straps at 3 inches thick. The first one was 20in long for the forearm strap, and the second was 12in long to become my handle. To get the measurements right, I put on my vambrace and gauntlet and found the right sizing for the straps, then drilled the holes for the bolts. With the handle I went one step further: in the place that would become the grip, I rolled the leather over itself so that it would be less wide and a little more comfortable to hold.
All in all, it was a huge learning experience for me to make and line this shield. I now know the right way to curve a shield (at least in theory), and when I get back from war, I'll be putting a curve on this one. For the next one I make, I will also be sure to have more time allotted to it so I can make sure it comes out nice. For now, this first attempt is going to be put through its paces next week at Gulf Wars. Since I will be away, there will be no blog post, but expect a full breakdown of war when I get back. Hope to see you guys at war, doesn’t matter the side. The more the merrier!
No comments:
Post a Comment